The following article will lead you through Multi Factor Authenticator setup.
More on what is MFA can be found here: Multi Factor Authentication (MFA) – Fuse Collaboration.
You can complete the MFA setup either by following the video tutorial below, or by following the article further down below.
Prerequisites:
- Have your personal phone ready at hand.
-
Have a work laptop or computer ready to follow through the article and to log into your work account.
MFA Setup:
When signing in to your Microsoft 365 account online on your laptop/desktop, you will go through the normal process of providing your email and password. Once these details are provided, you will receive a prompt asking you for additional information.
- Press Next, you will be prompted to install Microsoft Authenticator, see below on how to do this both for Android and iOS.
Microsoft Authenticator App Setup (First time setup)-
Please note: Make sure to select the app with the correct developer/owner as Microsoft Corporation. The app should not ask you for any payments or your bank details.
If you already have the app, skip the initial first steps until you reach the part of the setup titled “Existing app”.
For Android devices, please use Google Play Store and locate the following app via search bar (note the name and developer name below in green):
For iPhone devices, please user App Store and locate the following app via search bar (note the name and the developer name below in blue):
- Once the app is downloaded, if prompted, allow notifications.
- Open the app, select Add work or school account.
-
Select Scan QR code (allow the app to use your camera if prompted).
To continue the setup, follow the below instructions starting from the on screen QR code.
Existing app
- Open the app, in the top-right corner select the “+” icon, select Add work or school account.
-
Select Scan QR code (allow the app to use your camera if asked).
- On the computer desktop, click Next and Next again, until you reach the below screen:
- Using the Authenticator app on your phone scan the QR code on the screen, this should register your account with the phone for MFA notifications. (The code generated by your account through this setup, will be different from the one displayed on the above photo).
- Once that is complete, press Next on the laptop/computer.
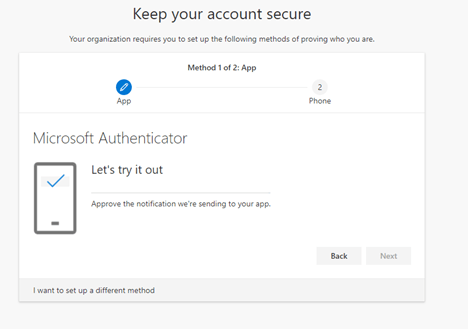
- If setup was completed correctly, the following screen will appear, and your phone will receive a notification:

Please note: If you do not receive notifications, re-install the app and try the steps again, make sure to allow push notifications.
- Once the notification is approved, the Next button will be blue and will allow you to complete setup. Once Next is pressed the setup is complete, please re-sign into all apps you use with your Microsoft account, such as Outlook, OneDrive etc.